Installation Guide
Using Maven
Rtc555 Android SDK is available in jcenter and mavenCentral repositories.
- To use jcenter and google in the project, please include below code in the project's build.gradle.
  allprojects {
      repositories {
          google()
          jcenter()
      }
  }
- To use mavenCentral in the project, following code should be added to the project's build.gradle.
  allprojects {
      repositories {
          ...
          mavenCentral()
          maven {
                 url 'https://oss.sonatype.org/content/repositories/snapshots/'
           }
           maven {
                  url "https://raw.githubusercontent.com/555platform/555-rtc-android-sdk/master/Releases"
           }
      }
  }
And, add SDK's package to dependencies in app/build.gradle file like,
  dependencies {
      implementation 'com.comcast.rtc555sdk:Rtc555Sdk:<version_number>'
  }
Also make sure the Mandatory Dependencies are added.
Using library manually
Below steps explain how to add Rtc 555 Android SDK to your android project.
Add .aar files as new Modules.
- Download SDK from the Releases and unzip. There you will find all the .aar files required.
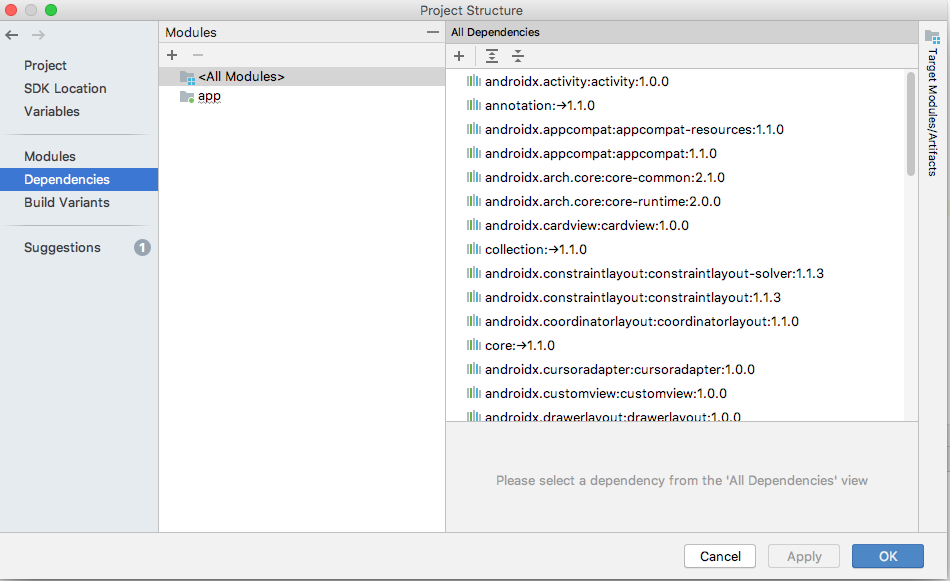
- Open File>Project Structure in Android Studio.
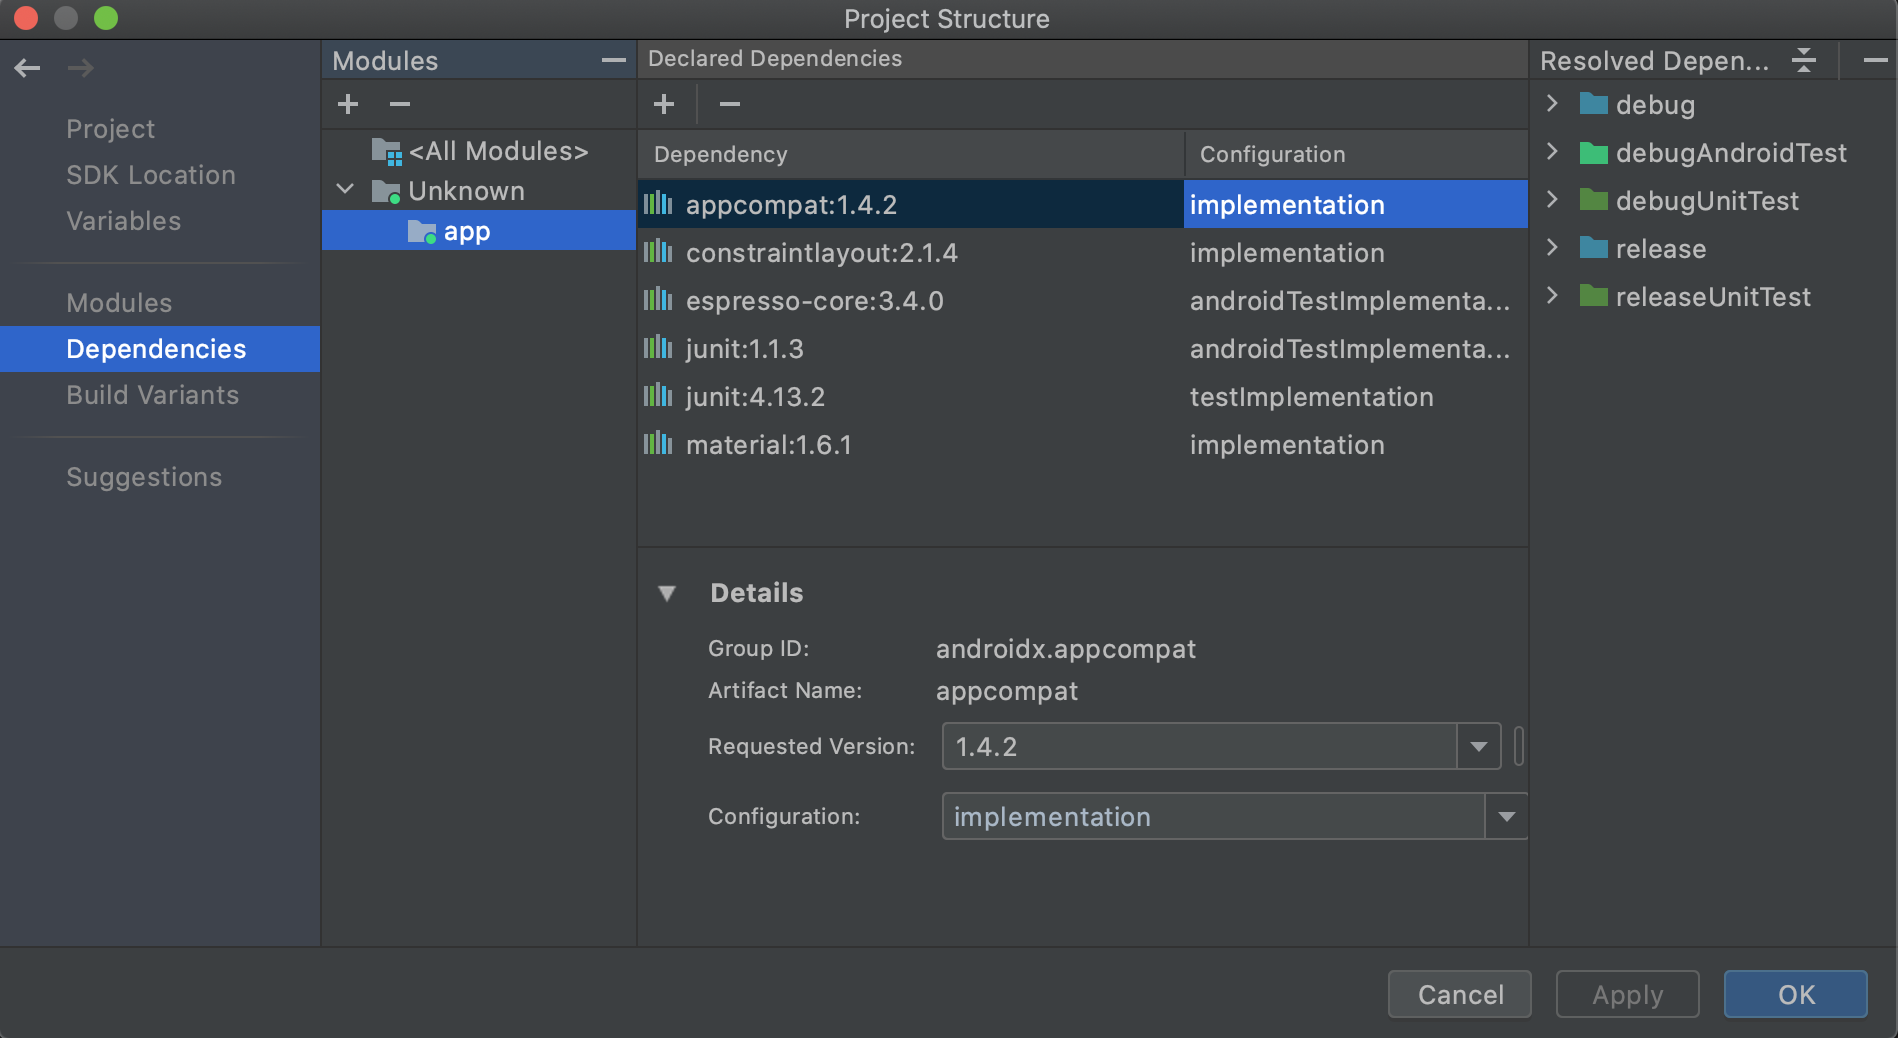
- Select dependencies tab on the left side of Project Structure window.
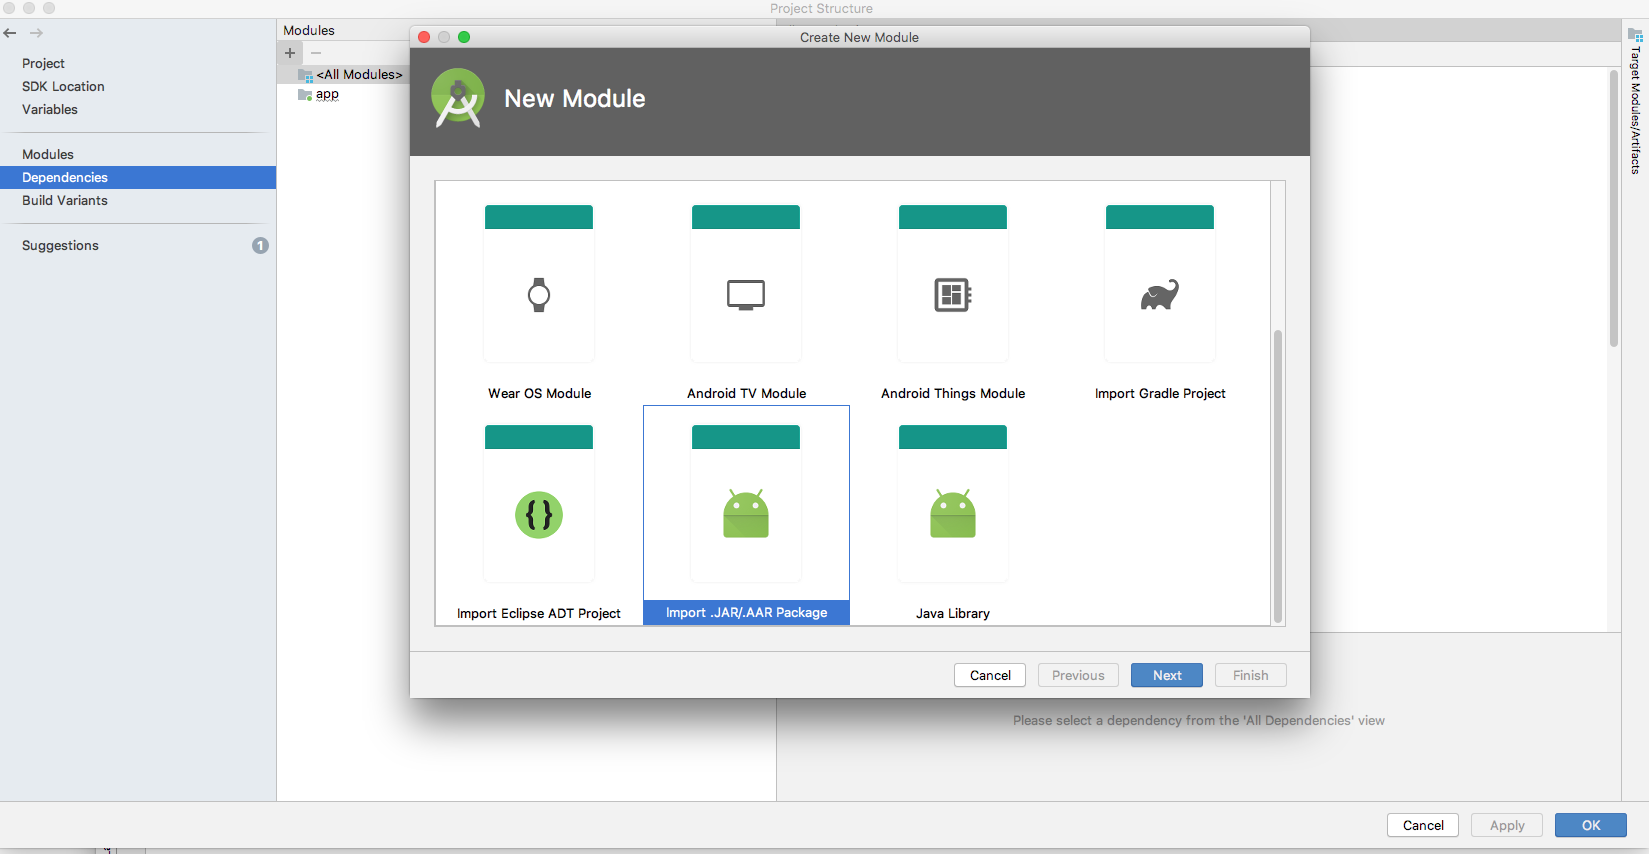
- Click on the "+" icon on top left corner to add a new module and select Import .JAR/.AAR Package and click Next.
- Browse and choose a .aar file from the downloaded Rtc 555 Android SDK's AAR files. Do this for all the AAR files.
- All the modules of the respective AAR files are now listed under the modules. This will be reflected in project's settings.gradle file.
Add this modules as dependency to your app module
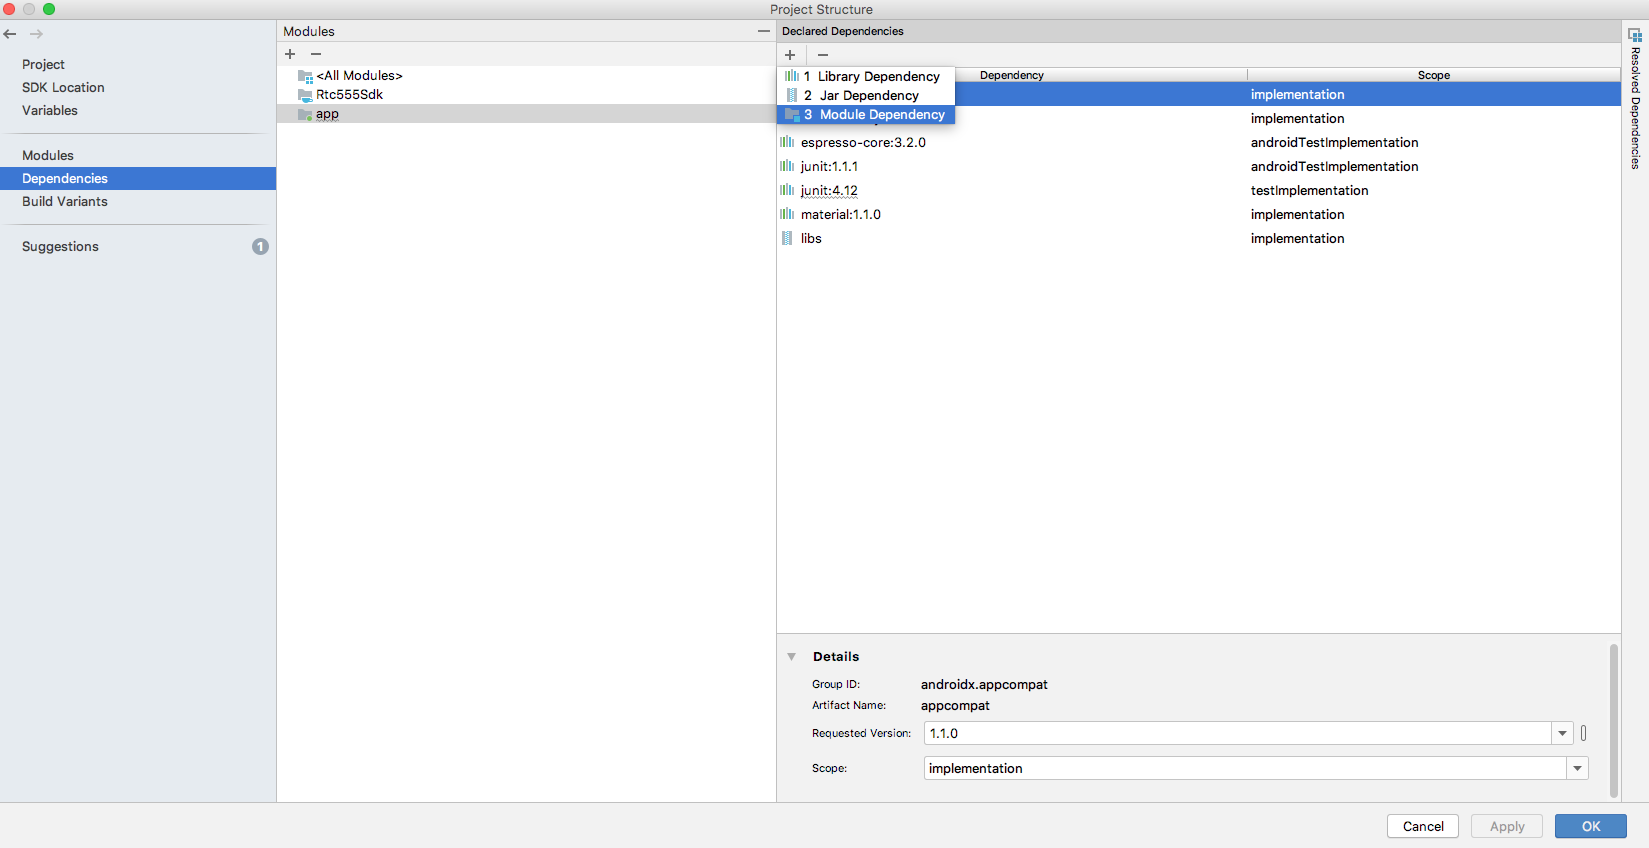
- Click on your app module in project Structure, Open dependencies tab. Click the "+" icon on the left top corner of declared dependencies and select 3. Module Dependency.
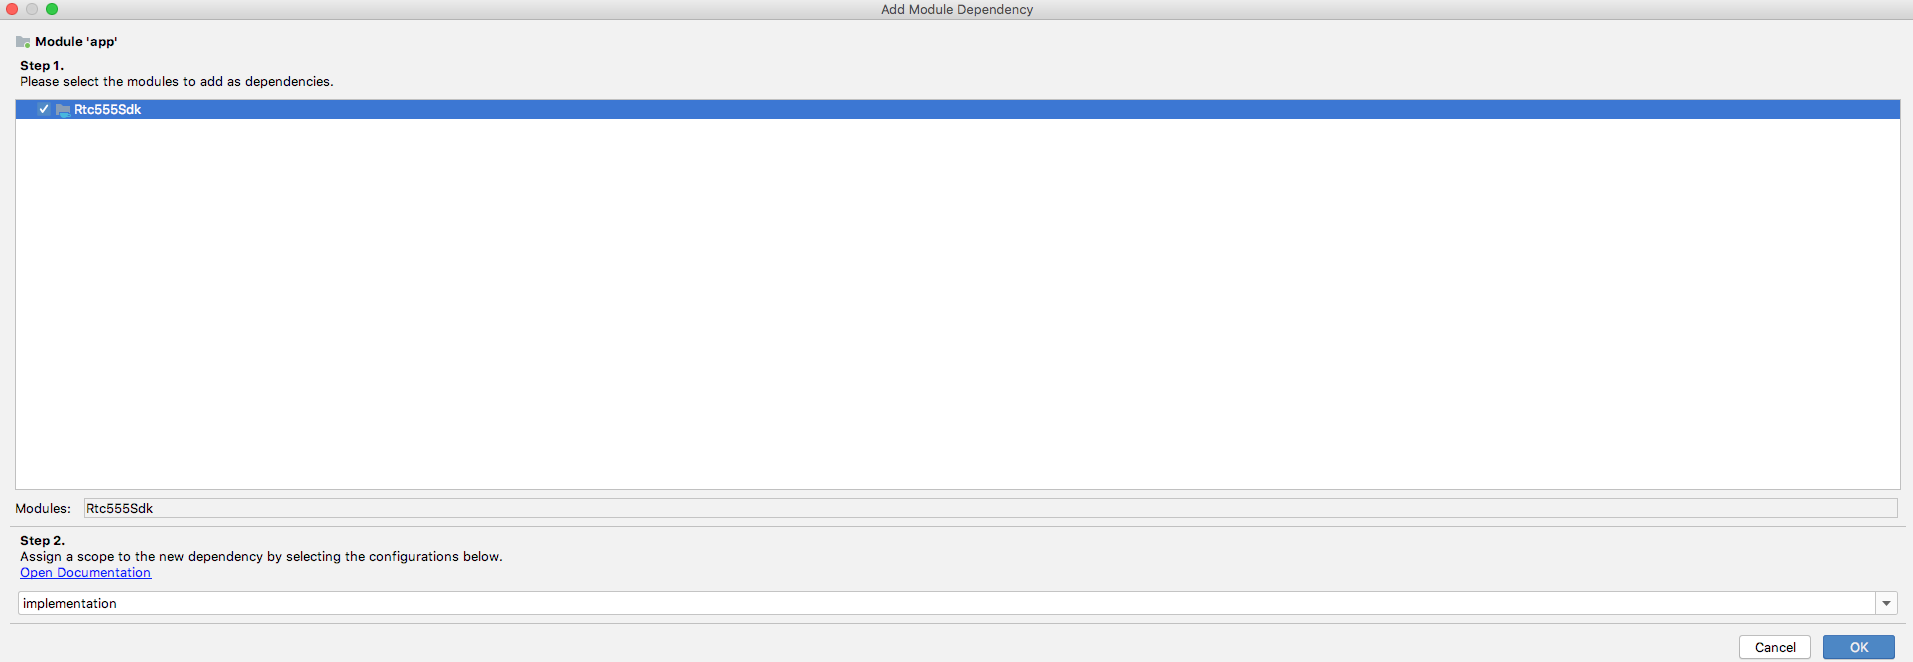
- Select the modules from the Add Module Dependency window and click on OK.
- And, This change has to be reflected in app's build.gradle file.
For Android Studio version 2020.3.1 (Arctic Fox) and above follow the below steps to add Rtc 555 Android SDK.
Add .aar file
- Download SDK from the Releases and unzip. There you will find all the .aar files required.
- Copy the .aar files to app/libs directory
- Open File>Project Structure in Android Studio.
- Select dependencies tab on the left side of Project Structure window.
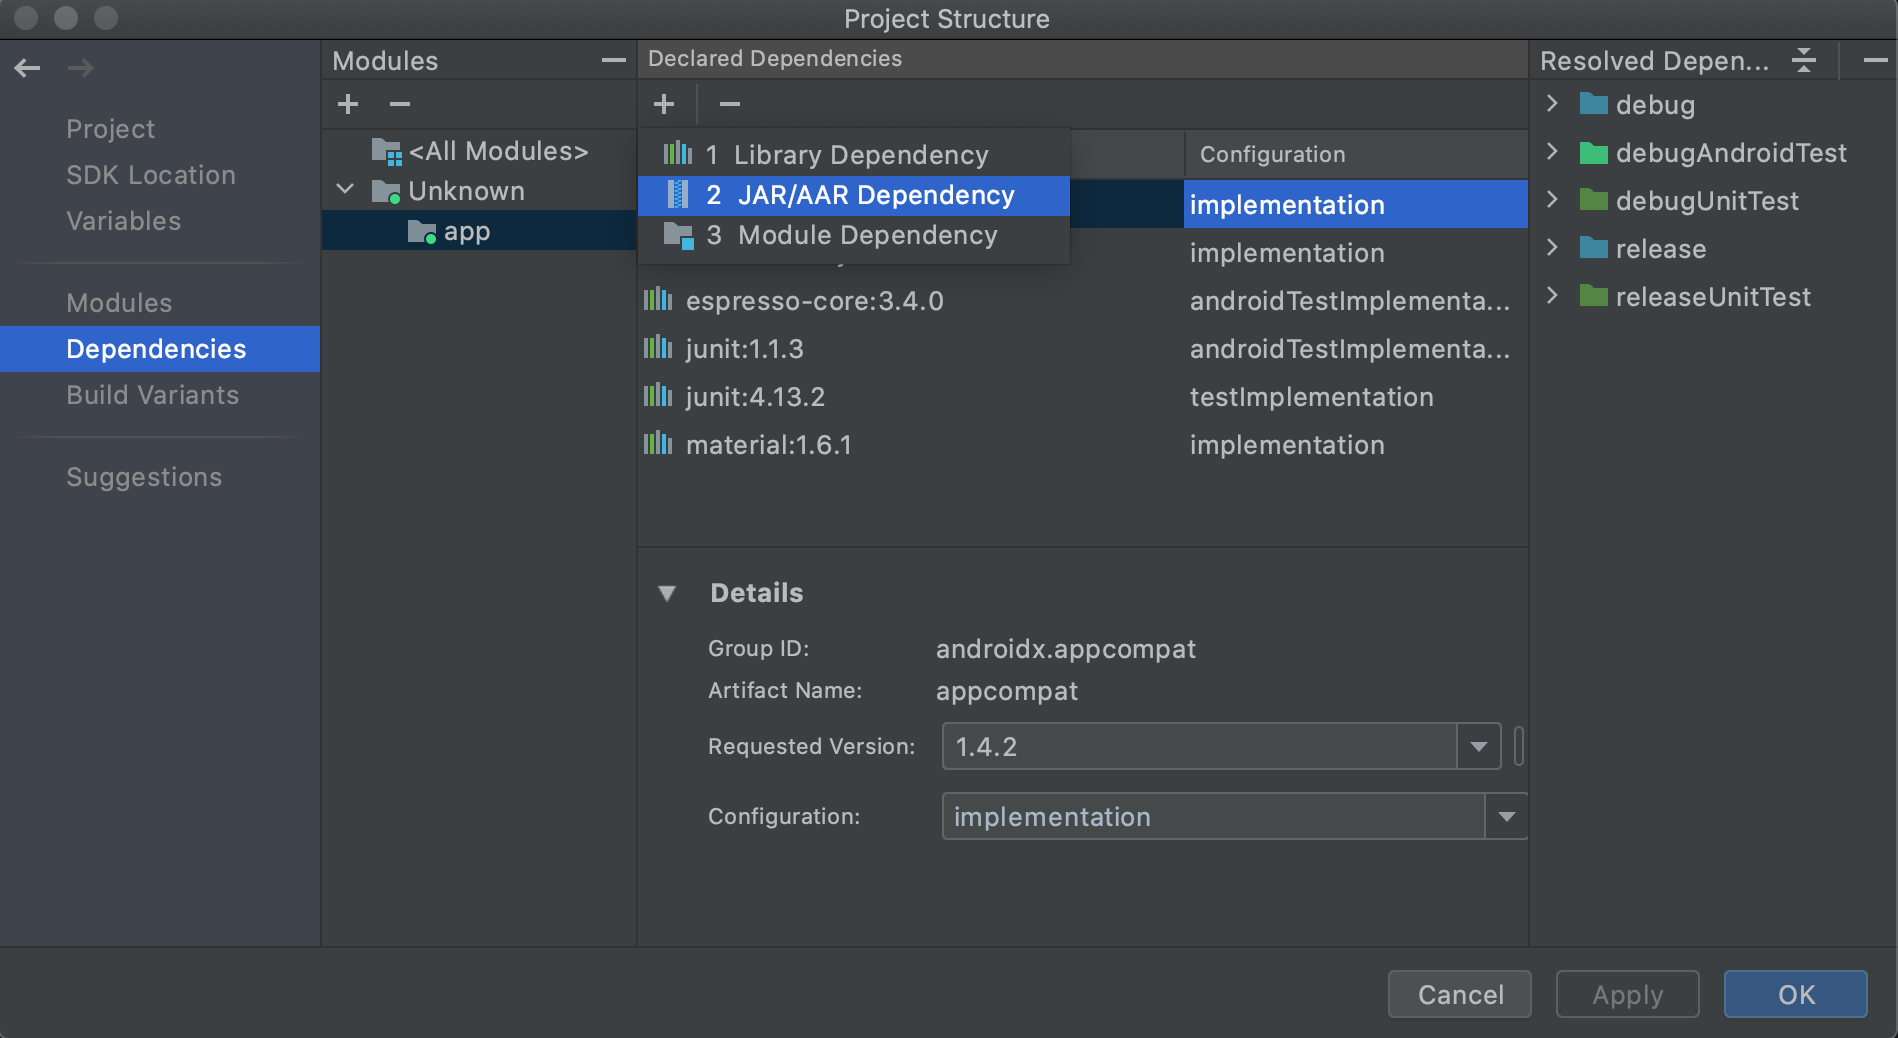
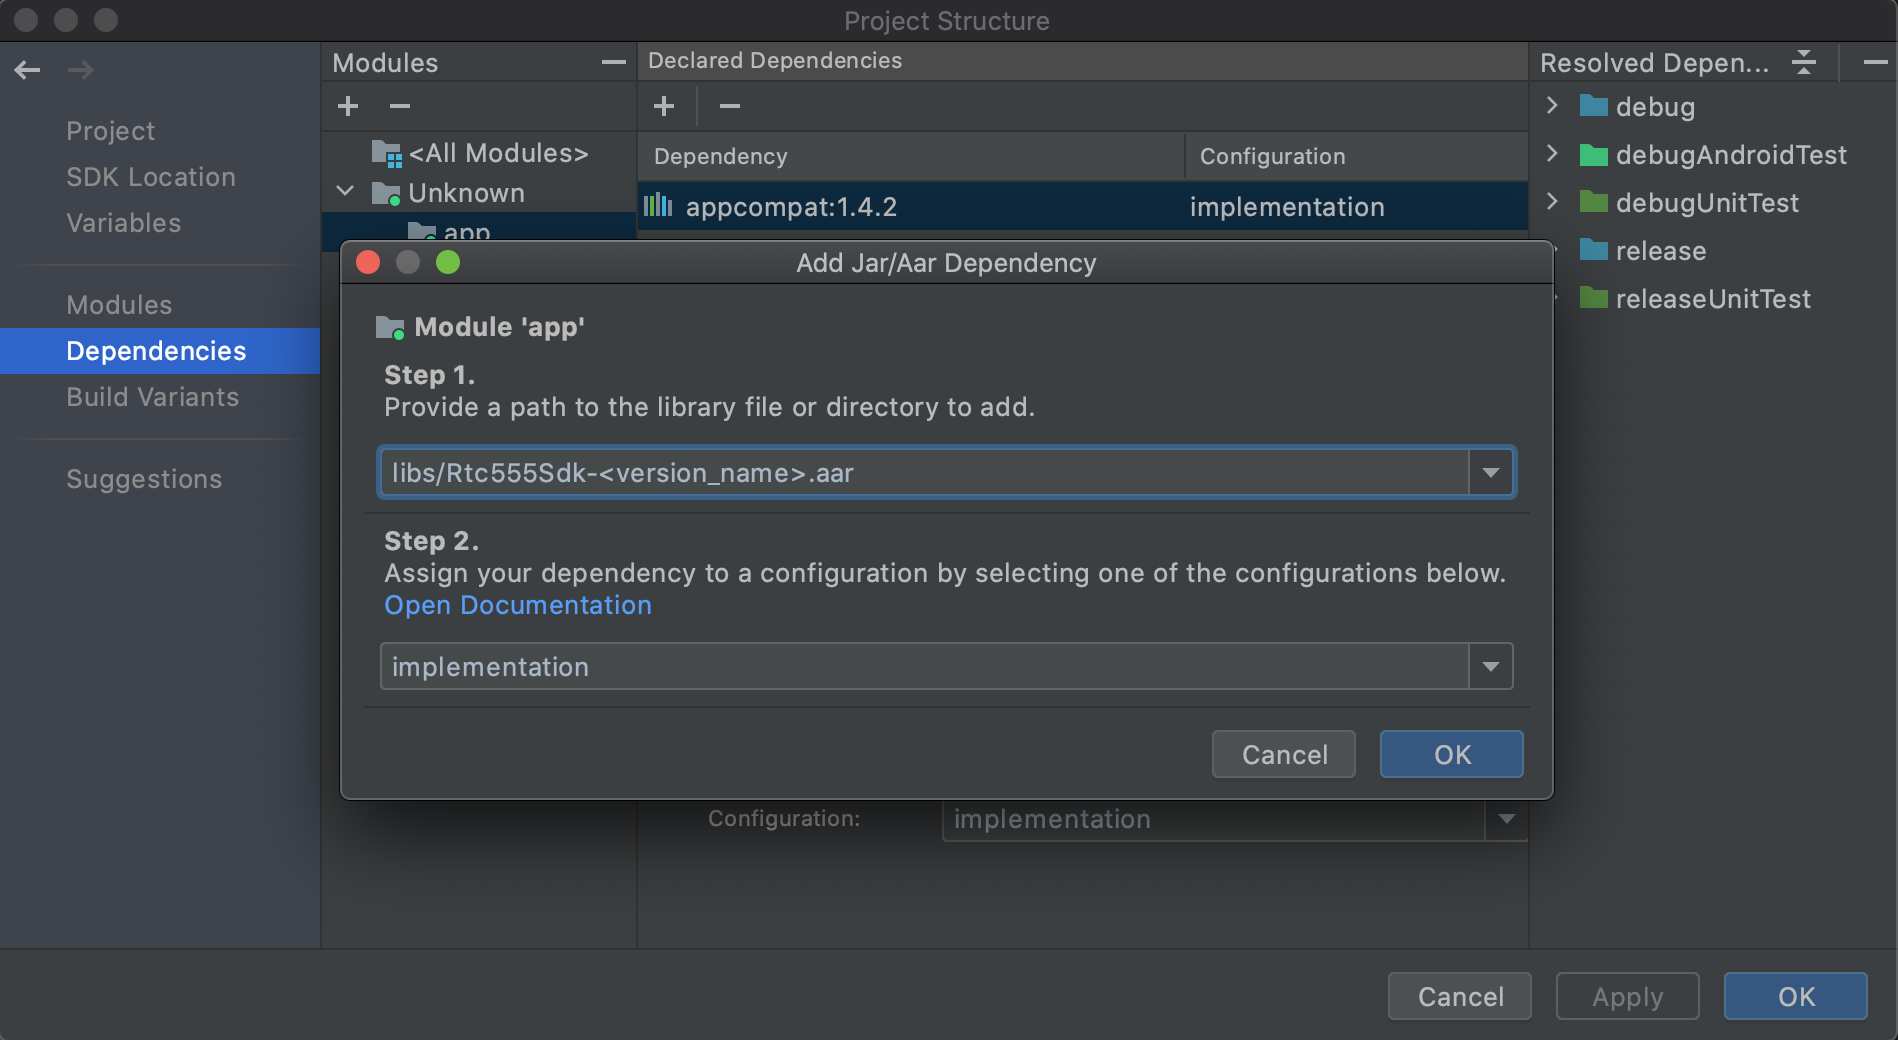
Select app and click on the "+" icon on top left corner and select JAR/AAR Dependency.
Add .aar file path that you copied in app/libs directory in Step 1 and click OK and then finally click Apply. Follow the same process for all the .aar files that you added in the libs directory.
- Now the dependency will be reflected in the app/build.gradle file as:
    dependencies {
      ...
      implementation files('libs/Rtc555Sdk-<version_name>.aar')
      implementation 'com.ocetnik.timer:react-native-background-timer:2.0.0'
      implementation 'com.oney.WebRTCModule:react-native-webrtc:1.100.1v01'
      implementation 'com.facebook.react:react-native-0.63.3:1.0.0'
      implementation 'org.webkit.androidjsc:android-jsc-intl-r245459:1.0.0'
      implementation 'com.reactnativecommunity.webview:react-native-webview:1.0'
      implementation 'com.oblador.vectoricons:react-native-vector-icons:2.0'
      implementation 'com.zmxv.RNSound:react-native-sound:2.0'
      implementation 'com.zxcpoiu.incallmanager:react-native-incall-manager:2.0'
      implementation 'com.learnium.RNDeviceInfo:react-native-device-info:3.0.0'
      implementation 'com.psykar.cookiemanager:react-native-cookies:2.0.0'
      implementation 'com.reactnativecommunity.netinfo:react-native-community_netinfo:2.0.0'
      implementation 'com.reactnativecommunity.asyncstorage:react-native-community_async-storage:2.0.0'
    }
Also make sure the Mandatory Dependencies are added.
Mandatory Dependencies
- Add below mandatory dependency in your app/build.gradle
    dependencies {
      ...
      //Add the below dependencies after SDK package
      implementation 'androidx.swiperefreshlayout:swiperefreshlayout:1.1.0'
      implementation 'com.facebook.infer.annotation:infer-annotation:0.18.0'
      implementation 'com.facebook.fresco:fresco:1.9.0'
      implementation 'com.facebook.fresco:animated-gif:1.9.0'
      implementation 'com.facebook.fresco:animated-webp:1.9.0'
      implementation 'com.facebook.fresco:webpsupport:1.9.0'
      implementation 'com.facebook.soloader:soloader:0.6.0'
      implementation 'com.facebook.fresco:imagepipeline-okhttp3:2.0.0'
      implementation 'com.android.installreferrer:installreferrer:2.2'
      implementation 'javax.inject:javax.inject:1'
      api 'io.reactivex.rxjava2:rxandroid:2.0.1'

      //okhttp3
      implementation 'com.squareup.okhttp3:okhttp:3.12.1'
      implementation 'com.squareup.okhttp3:logging-interceptor:3.10.0'
      implementation 'com.squareup.okhttp3:okhttp-urlconnection:3.12.1'
   }
- Configure AndroidManifest.xml of your app module.
  <uses-permission android:name="android.permission.INTERNET" />
  <uses-permission android:name="android.permission.RECORD_AUDIO" />
  <uses-permission android:name="android.permission.MODIFY_AUDIO_SETTINGS" />
  <uses-permission android:name="android.permission.CAMERA" />
Migrate your project to AndroidX using Android Studio
As SDK requires AndroidX support, migrate your android project to AndroidX. If your project already have AndroidX support, then ignore this step. Below steps explain how to migrate your project to AndroidX.
- From the menu bar, click Refactor and then Migrate to AndroidX
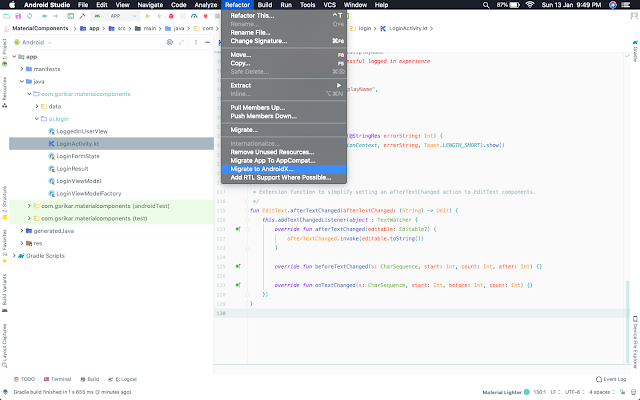
- Click Migrate and if you want to backUp before migration, choose back up option
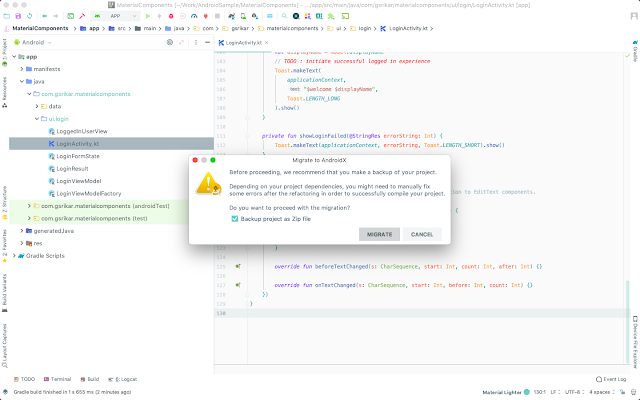
- Verify the dependencies, the package names that are getting refactored and then finally click Refactor
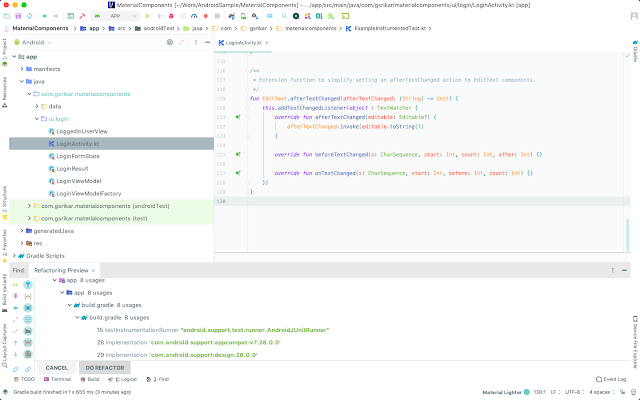
Once finished, you can see the updated package names and dependency names. In addition to that, the Refactor option adds below lines to gradle.properties file.
        android.useAndroidX=true
        android.enableJetifier=true
Configure build.gradle of your app module.
As some of the React Native modules used in the sdk uses java 8, Your android project should enable java 8 support.
To enable java 8 language support in your project, add the following code inside android block to the app's build.gradle.
  android {
    ...
      compileOptions {
          sourceCompatibility JavaVersion.VERSION_1_8
          targetCompatibility JavaVersion.VERSION_1_8
      }
  }
- Add packagingOptions & set minifyEnabled to false inside android block to the app/build.gradle.
  android {
      ...
        packagingOptions {
          pickFirst '**/libjsc.so'
              pickFirst 'lib/armeabi-v7a/libfb.so'
              pickFirst 'lib/x86/libreactnativejni.so'
              pickFirst 'lib/x86/libfolly_json.so'
              pickFirst 'lib/armeabi-v7a/libreactnativejni.so'
              pickFirst 'lib/x86/libglog.so'
              pickFirst 'lib/armeabi-v7a/libfolly_json.so'
              pickFirst 'lib/armeabi-v7a/libglog.so'
              pickFirst 'lib/x86/libfb.so'
              pickFirst 'lib/x86/libjingle_peerconnection_so.so'
              pickFirst 'lib/arm64-v8a/libjingle_peerconnection_so.so'
              pickFirst 'lib/x86_64/libjingle_peerconnection_so.so'
              pickFirst 'lib/armeabi-v7a/libjingle_peerconnection_so.so'
      }

      buildTypes {
          ...
            debug{
                minifyEnabled false
            }
      }
  }
Ensure minSdkVersion is >= 23
Recommended gradle plugIn version
Given below the recommended gradle plugIn version that need to be added to the dependencies block of project build.gradle.
dependencies {
    ...
    classpath 'com.android.tools.build:gradle:3.5.3'
}
How to Access SDK APIs
The APIs in Rtc555Sdk are included under the package com.comcast.rtc555Sdk. In order to access the public APIs and other public variables from Rtc555 Android SDK, include the Rtc555Sdk package in your implementation class.
import com.comcast.rtc555sdk.*;